Wednesday, 15 May 2019

HOW TO MOVE ALL FSMO ROLE USING GUI

Please see my previous post to find the FSMO roles.
https://theitways.blogspot.com/2019/05/how-to-find-fsmo-roles-on-your-sever.html

If you need to migrate the FSMO role using GUI you have come to the right place.

To move Domain wide roles
- Infrastructure Master
- Relative ID (RID) Master
- PDC Emulator

1. Login to the server with Network domain admin permission where you want the FSMO migrated
2. Open run and type in
DSA.MSC
3. This will open Active Directory Users and computers
4. Right click on your domain name and Click on OPERATIONS MASTERS..

5. On  operation master you can move the 3 domain wide roles


To move Forest wide roles
Forest Wide Roles
- Schema Master
- Domain naming Master

For Domain naming master
1. Login to the server with Network domain admin permission where you want the FSMO migrated
2. Open CMD by running as Administrator
3. On Cmd type in the
regsvr32 schmmgmt.dll

4. This will Register the schema managment dll.
5. Open run and type in
MMC
6. On MMC click on FILE and ADD/REMOVE SNAP-IN

7. Select ACTIVE DIRECTORY SCHEMA , Click on ADD and click on OK

8. Right Click on active directory schema, and click on OPERATION MASTER


9. Click on change to transfer the role

For Domain naming master
1. Login to the server with Network domain admin permission where you want the FSMO migrated
2. Open run and type in
DOMAIN.MSC
3. This will open Active directory domain and trust
4. Right click on Active directory domain and trust and click on OPERATION MASTER..


5. Click on CHANGE to transfer the role

Good Luck!!


HOW TO FIND FSMO ROLES ON YOUR SERVER

Hi ya,


If you are an administrator with multiple server, You definitely need to know where the FSMO (Flexible Single-Master Operation) roles are installed . There are 5 FSMO roles

Forest Wide Roles
- Schema Master 
- Domain naming Master 
Domain Wide Roles
- Infrastructure Master
- Relative ID (RID) Master 
- PDC Emulator

To simply find the 5 FSMO roles, login into to one of your server using network administrator account,

1. Open up your Command prompt
You can do this by open Run (Windows + R )
Then type in 
CMD

2. On command prompt type the following
netdom query fsmo


Good luck !!

Monday, 1 April 2019

HOW TO DELETE STUCK PRINT JOBS IN WINDOWS SERVER

Hi Ya,

If you have cancelled you jobs in print queue and the job is still stuck, you have come to the right place. Here is how you can clean your stuck print jobs.

1. On the server where your print management is installed, Open up print management
You can do this by open Run (Windows + R )
Type in the following

PRINTMANAGEMENT.MSC

2. On the Print Management console, Right click on your print server name > Click properties.
3. Open the Spool folder location

4. Open Services

You can do this by open Run (Windows + R )
Type in the following

SERVICES.MSC

5. Find Print Spooler and stop the service, (don’t close the console as you need it to start again)

6.Delete all the file inside the step 3 location
7. Start the print spooler
8. Close and open your print management console.

This should remove all the stuck print jobs. Please make sure that you are logged in with admin privilege .

Good luck !!
8. Close and open your print management console.

Thursday, 14 March 2019

HOW TO ADD TWO IP ADDRESS IN ONE NETWORK INTERFACE CARD(NIC)


Hi ya,
If you are wondering how you can add two IP address in one NIC card, you have come to the right place.  Please follow the following step below.

1. Open up your Network connection
You can do this by open Run (Windows + R )
Type in the following

NCPA.CPL

2. Double click required Port – Ethernet if you are using LAN or Wi-Fi if you are using Wireless.


3. Select the Internet Protocol Version 4 (TCP/IPv4) , Click properties
4. Make sure you untick obtain an IP address automatically and select the Use the following IP address

5. Fill in the Primary IP address, subnet mask, defaultgate , Preferred DNS server and Alternate DNS server details.


6. Then Click on Advance... and click on Add
7. Fill up the box with the secondary IP address and subnet you desire.

Good luck !!!


Thursday, 31 January 2019

HOW TO CONFIGURE SCAN TO EMAIL ON RICOH PRINTER USING GMAIL


Hi Ya,
This is for the people who have Ricoh printer on their organisation and wants to use Gmail SMTP server. To make it simple, let me break down to two phase for you 1.)Configuring gmail and 2)Configuring Ricoh device

1.) Configuring gmail
- Make sure you have created your Gmail account for this purpose
- Login to your gmail scan account and go to
https://myaccount.google.com
- Go to security and enable less secure app access


2.) Configuring Ricoh device.
- login to your Ricoh device using a web browser as device admin.
- Go to Device Management then Configuration


- Go to Email


- Input the following settings

Administrator email address: Your Gmail scan email account
Auto specify sender Name: On

SMTP
SMTP server name : SMTP.GMAIL.COM
SMTP port no: 465
User secure connection (SSL): On
SMTP authentication: On
SMTP Auth. Email Address: Your Gmail scan email account
SMTP Auth. User Name: Your Gmail scan email account
SMTP Auth. Password : Your Gmail scan email password

SMTP Auth. Encryption: Inactive


You can also find Google SMTP settings on official google website.
https://support.google.com/a/answer/176600?hl=en

Good Luck !!!


Thursday, 5 July 2018

HOW TO CREATE WMI FILTERS FOR SPECIFIED VERSION OF WINDOWS ( GROUP POLICY)


Hi ya,

If you want to create a group policy where you want to filter the GP by the version of windows you have come to the right place.


1. On your Domain Controller, Open Group Policy Management console
( Windows + R and "gpmc.msc" )
2. Right click in WIM Filters and Click on New


3. Put the name you desire - Say "Windows 7 - device" for windows 7
4. Click on Add
Use the following for different version of windows


WMI Filter to target: Windows 7 Workstations
Query Namespace: root\CIMv2
Query: select * from Win32_OperatingSystem where (Version like "6.1 and ProductType = "1"


WMI Filter to target: Windows 8.0 and Windows 8.1 Workstations
Query Namespace: root\CIMv2
Query: select * from Win32_OperatingSystem where (Version like "6.2%" or Version like "6.3%") and ProductType = "1"


WMI Filter to target: Windows 10 Workstations
Query Namespace: root\CIMv2
Query: select * from Win32_OperatingSystem where Version like "10%" and ProductType = "1"


Good luck !!!


Friday, 29 June 2018

HOW TO ORGANIZE YOUR ORGANIZATIONAL STRUCTURE (OU)

HOW TO ORGANIZE YOUR ORGANIZATIONAL STRUCTURE (OU) PROPERLY


Hi Ya,

I have seen many messy Active Directory Structure where there is mixture of users and computers. Creating and targeting policy is a messy. When you built your AD,it  will look like the picture on the right.

They are the default Microsoft AD OU structure. These OU has specific Purpose.
OU
CONTENTS
Builtin
The Builtin container holds default service administrator accounts and domain local security groups. These groups are pre-assigned permissions needed to perform domain management tasks.
Computers
The Computers container holds all computers joined to the domain without a computer account. It is the default location for new computer accounts created in the domain.
Domain Controllers
The Domain Controllers OU is the default location for the computer accounts for domain controllers.
ForeignSecurityPrincipals
The ForeignSecurityPrincipals container holds proxy objects for security principals in NT 4.0 domains or domains outside of the forest.
LostAndFound
The LostAndFound container holds objects moved or created at the same time an Organizational Unit is deleted. Because of Active Directory replication, the parent OU can be deleted on one domain controller while administrators at other domain controllers can add or move objects to the deleted OU before the change has been replicated. During replication, new objects are placed in the LostAndFound container.
NTDS Quotas
The NTDS Quotas container holds objects that contain limits on the number of objects users and groups can own.
Program Data
The Program Data container holds application-specific data created by other programs. This container is empty until a program designed to store information in Active Directory uses it.
System
The System container holds configuration information about the domain including security groups and permissions, the domain SYSVOL share, DFS configuration information, and IP security policies.
Users
The Users container holds additional predefined user and group accounts (besides those in the Builtin container). Users and groups are pre-assigned membership and permissions for completing domain and forest management tasks.

 Source:  https://sites.google.com/a/pccare.vn/it/ent-admin-pages/default-containers

Many engineers will just create users, computer or security group inside one of these OU or  Just create OU  saying users and workstation. Personally I don't like engineers doing this because this makes harder to manage the OU structure and it will create mess on long run. Instead creating a separate organizational unit (OU) naming as your Organization name would just do good.


If you have a small to medium organization to maintain, do create a a separate parent OU relating to your organizational name. Add sub OU creating Users , computers and Groups to organize.


This makes way way  convenient to maintain Active Directory (AD). This not only help you to understand your AD, It will also easy on applying group policy to apply. This is because you can create sub OU inside the parent OUs

For example if my Organization have floors or room, I can create OU under that name and place my computer base on floors. Easily apply printing Group policy to the computer base on floor 1.


Wednesday, 27 June 2018

HOW TO DELETE THE DOMAIN USER PROFILE CORRECTLY

HOW TO DELETE THE DOMAIN USER PROFILE CORRECTLY


Hi ya,

I believe every one has deleted user folder from
"C:\Users" to make some space on the windows drive or C drive.
Deleting user folder on a domain environment may cause user to login with a temporary profile. This is because when  new user log in a computer they also create SID records on the windows registry. Deleting user folder on "C:\Users"  wont delete the registry record.

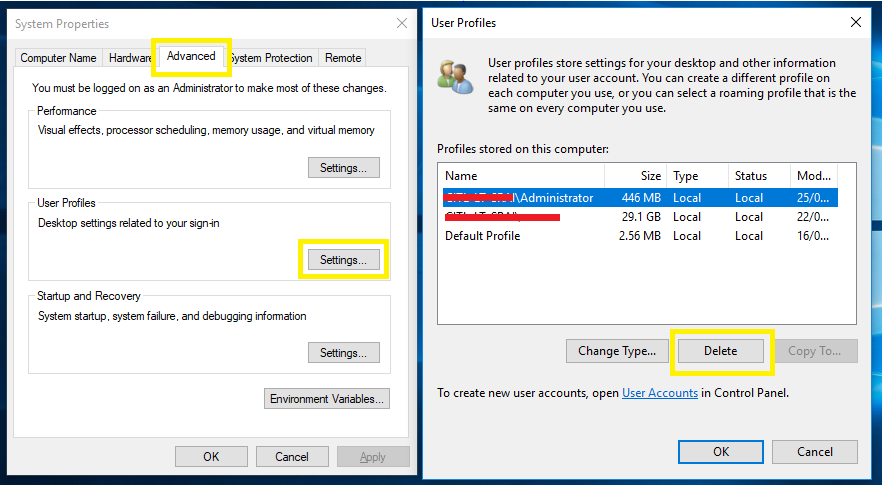
In order to avoid messing up the registry , here is the right way to delete the user folder.
Login is as administrator account on the computer where you need to delete the user folder.

1. Open Run or (Windows + R)
2. Type in "SYSDM.CPL" and Hit Enter

This will open your system Properties 

3. Go to "Advanced" tab 
4. Click on User profile "Settings"


5. Select the profile you want to delete and press delete


The above is the Microsoft recommended way to remove the profile .


OTHER WAYS TO DELETE  DOMAIN USER PROFILE

#Note: This can also help the people who are getting temporary login profiles.

Login as administrator account on the computer

1. Always make a note of the user name that you are going to delete
2. Delete selected user folder from the  "C:\Users"
3. Open Run or (Windows + R)
4. Type in "REGEDIT" and Hit Enter
5. Click on File then Export
6. Give a name and location to back up your registry.
#Step 5 and 6 is to be on safe side , if you accidentally delete wrong SIDs or Mess up the regedit.
7. Navigate to the following location  

Computer\HKEY_LOCAL_MACHINE\SOFTWARE\Microsoft\Windows NT\CurrentVersion\ProfileList


8. Browse through the Profile list and their username will show on Profileimagepath
9. Delete the records


Good luck !!

Friday, 22 June 2018

HOW TO TYPE ALL MSC (MICROSOFT MANAGEMENT CONSOLE) COMMAND LIKE IT PRO

HOW TO TYPE ALL MSC (MICROSOFT MANAGEMENT CONSOLE) COMMAND LIKE IT PRO


Hi all, 
If you are wondering how to open MSC command like an IT PRO. You can remember this commands and act like an IT Pro.

DSA.MSC
Active Directory Users & Computers
DSA.MSC /DOMAIN=domainname

DSA.MSC /SERVER=servername

DSSITE.MSC
Active Directory Sites & Services
GPEDIT.MSC
local Group Policy Editor
VIRTMGMT.MSC
Hyper V manager
MSTSC.MSC
Remote Desktop
DHCPMGMT.MSC
DHCP Manager
DISKMGMT.MSC
Disk Management
DNSMGMT.MSC
DNS Manager
COMPMGMT.MSC
Computer Management
EVENTVWR.MSC
Event Viewer
DEVMGMT.MSC
Device Manager
FSMGMT.MSC
Shared Folders
SERVICES.MSC
Service Configuration
RSOP.MSC
Resultant Set of Policy
SECPOL.MSC
Local Security Policy
LUSRMGR.MSC
Local Users and Groups
DFRG.MSC
Disk Defragmenter
REGEDIT.EXE
Run Registry Editor
MMC.EXE
Microsoft Management Console
PERFMON.MSC
Performance Monitor
DCPOL.MSC
Domain Controller Security Policy
DOMAIN.MSC
Active Directory Domains & Trust
DOMPOL.MSC
Domain Security Policy
DFSGUI.MSC
Distributed File System
IAS.MSC
Internet Authentication Service
INETMGR
Internet Information Service (\Windows\system32\inetsrv)
RRASMGMT.MSC
Routing and Remote Access
TSCC.MSC
Terminal Services


APPWIZ.CPL
Add/Remove Programs
TIMEDATE.CPL
Date/Time Properties
DESK.CPL
Display Properties
INETCPL.CPL
Internet Properties
MAIN.CPL
Mouse Properties
MAIN.CPL KEYBOARD
Keyboard properties
FONTS
For Fonts folder
NCPA.CPL
Network Connection
SYSDM.CPL
System properties


CMD.EXE
Command Prompt
MSINFO32.EXE
Hardware and software configuration information
MSCONFIG
System Configuration
WINVER
Windows Version
CONTROL
Control panel
NETPLWIZ
User Account
MRT
Microsoft Windows Malicious Software Removal Tool
FIREWALL.CPL
Firewall
Good Luck !!